🎉 Celebrating 25 Years of GameDev.net! 🎉

Not many can claim 25 years on the Internet! Join us in celebrating this milestone. Learn more about our history, and thank you for being a part of our community!

More of the turtle dude

Published July 07, 2010
Advertisement
So I decided to take the time to flesh my little test dude out a bit more. I kinda like him now. I could see myself actually using him in a game. Here is a render from Blender of him; the one in the background is the high-res version sculpted and painted in Sculptris (about 120k triangles) and the one in the foreground is the reduced and baked low-res version (about 1.8k tris). He animates pretty smoothly for the iffy re-topo job I did. It was a quickie job, using Decimate plus some manual edge editing, rather than Shrinkwrap and Retopo on a new mesh.


During my first few days of playing with Sculptris, I toyed with various methods of building the base, high-res mesh. Many online tutorials involving ZBrush and friends present a workflow wherein the artist creates a very rough base mesh in another program, or globs together a very rough base mesh in ZBrush from which to obtain a surface to begin with. So I tried a few experiments with roughing-out a shape in Blender using metaballs or sub-surfaced extruded cube meshes, with mixed results. The idea is, of course, sound.... providing you have a very clear idea of your end result. I'm not very skilled at sketching freehand, so I currently don't have any kind of concept sketches from which to work. So, for this test model, I worked purely within Sculptris, starting with the default sphere and using G with large brush sizes to quickly rough-out the shape. Not having concept sketches, this method was probably the best for me. Even with a concept sketch, though, I could see this being a decent workflow to start. The rough shaping of a mesh using G is very fluid and free-form, and intuitive. I can pull out 'tendrils' using G, then use C (inflate) to blow them up and shape them as needed, with the detail slider set mid-range so that detail is added as the tendril inflates.

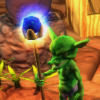
With Turtle Dude, I used G to squash the starting sphere, went into Draw mode (D) and roughed in the shape of the shell, depressed a few concavities for armholes, headhole, tailhole, etc... then used G to draw out tendrils for each extremity. C inflated them up to roughly the proportions I needed, then from there it was just simple refinement: a crease here, a smooth there, etc... All in all, the process worked very well, and I was able to achieve decent results fairly quickly. Total time spent, from base sphere to final low-poly textured version (minus rig and animation, which are still in progress) was about 3 or 4 hours, and a good chunk of that was spent fiddling with lights and re-baking the low-poly texture. The initial sculpting job was still fairly low-res compared to some examples I have seen online, but my lappy simply can not handle meshes in excess of about 500k tris or so. Plus, considering the scale of my current game project, more detail probably isn't necessary.

In the future, I would like to upgrade my hardware so that I can play with normal-mapped models in-game. Currently, I don't bother baking a normal map, and just do a texture bake with shading, diffuse, and ambient occlusion all into a single colormap texture. The obvious results of this are visible in the flattening of the bumps on the shell, the flattening and obscuring of the scale patterns, etc...

I'm really starting to enjoy this process, now that I'm getting a little confidence under my belt. I might even go so far as to say I enjoy it more than programming.
Previous Entry Learning Modelling
Next Entry Environment
0 likes 3 comments

Comments

evolutional
Was going to reply to your previous post, but you have a new one now...

a) Thanks for the sculptris tip, I'd never heard of it and the lack of ZBrush cash/experience I'd never even heard of this type of modelling

b) Your results in the first post are nice.

c) Your results in the second post are awesome.

d) The main thing I'd be interested in is how to derive a low-poly model from the sculptris model, but it seems like you're already trying to figure this out, with some success

e) Hey buddy how's it going?

July 07, 2010 04:49 PM
Moe
Very cool indeed. I have had a chance (just briefly) to play with Zbrush, but the price on a tool like that (or Maya, which I really would like to get) is definitely prohibitive. I think I'm definitely going to have to try Sculptis out see how it runs.
July 07, 2010 06:04 PM
JTippetts
Quote: Original post by evolutional
e) Hey buddy how's it going?


Going pretty well, now that I'm getting fired up for this stuff again. I gotta stop going through these long periods of utter inactivity, though. Maybe I'd get something done if I did.

Sorry you had to get rid of your cat. I remember when my mom's cat started to get old, she forgot all her training and started using all the potted plants as litter boxes. Quite annoying.

Pop me a chat on FB sometime if you happen to catch me on. We ought to catch up.

Quote:

a) Thanks for the sculptris tip, I'd never heard of it and the lack of ZBrush cash/experience I'd never even heard of this type of modelling


I remember looking (briefly) into ZBrush, and at one point I even attempted to purchase a copy. (This was during better times. Disposable income FTW.) However, I encountered problems with completing the credit card transaction, problems that ran all the way up to that card being flagged for suspicious activity and suspended. Awkward moment at the checkout counter in McDonalds followed. So I dropped the idea and never really did much with modeling at all after that, outside of fiddling around with procedural textures and environment modeling on a small scale. It wasn't until I happened to catch a link to the 1.0 build of Sculptris a couple weeks ago that I started to think about modeling again.

Quote:

b) Your results in the first post are nice.

c) Your results in the second post are awesome.


Thanks. I'm pretty happy with how he has turned out. In the first post, he was very rough, only about an hour old when I baked him, if that. Plus, I botched the texture map bake a bit (enabled shadows created artifacts) so he looked kinda blotchy.

I'll probably go back and repaint, I'm not too thrilled with the colors at the moment. Re-skinning in this process is actually fairly easy; I just take the high-res model back into Sculptris paint, and paint on the new colors, then reload the new high-res texture map in Blender and re-bake the low-res texture.

At this point, I think it's just a matter of perfecting the workflow, then getting some more practice. In the meantime, this guy has replaced Stickdude and Old Golem Avatar as my default "dude" in my various game-type twiddlings. It's amazing the boost to motivation you get when your characters actually look like real characters, and not just more ugly placeholder art. I highly, highly, highly recommend this to people trying to stay motivated on a project. Has worked wonders for jump-starting me again.

Quote:
d) The main thing I'd be interested in is how to derive a low-poly model from the sculptris model, but it seems like you're already trying to figure this out, with some success


I'll try to describe as best I can without images the workflow I followed. Bear in mind I'm still a noob at this.

For the low-poly in this post, I simply used Decimate. After I finished sculpting and painting (color and bump) in Sculptris, I exported the mesh to an .OBJ file, and imported that into Blender. I then promptly duplicated the imported mesh, and set one of the copies up as the high-poly source. To this one, I added a material with 2 textures: the colormap and bumpmap I painted in Sculptris, with the bump map texture source set to affect Nor in the material settings, with the Nor strength slider stuck somewhere around 10. This part takes a little trial and error to get the bump scaling just right.

Then I applied a Decimate modifier to the second copy of the mesh, and turned it down until I got a face count in the range of 1500 to 2000 faces. I applied the modifier, and enabled Smooth shading on the mesh. I entered edit mode, and tweaked a few edges I wasn't happy with.

I'm still on the fence about the actual process of reducing detail. Community wisdom has it that animation has strict requirements regarding topology of the underlying mesh, and I have found this to be fairly accurate. I have done models before with the Decimate modifier that animated very poorly. However, I think that there is a grey area here; as the low-res mesh resolution increases, the impact of topology on the animation of the mesh decreases. However, having clean topology definitely helps in the process of bone assignment while rigging the mesh, as you can select edge loops at a time. Decimated meshes have no clean edge-loop structure. However, for this test dude, I didn't bother with manual vertex weighting and assignment; I simply built the armature and parented the mesh with assignments using bone heat and (maybe luckily, maybe not) achieved near-flawless results. YMMV on this, I'm still learning about the best ways for rigging and animating, and I doubt bone-heat is the best way to assign.

The upshot of it is: so far, Decimate has been good enough. In the long run, though, it may cause problems, and if mesh topology must be clean, then the process I followed for the earlier reduce of the mesh is this:

Create a new un-filled circle mesh of some number (26 or so, depends on the desired resolution of the final mesh) vertices, and enter edit mode. Move, scale, rotate the verts of the circle until they form a ring or collar around Test Dude's neck, fitting the high-poly mesh as closely as possible without doing manual vertex editing, then select them all and extrude seven or eight tubular sections, scaling and rotating and moving each section to roughly fit the profile of the torso/shell section. Once the shell is roughed in, create a Shrinkwrap modifier for the low-poly mesh, target it to the high poly mesh, and apply it. All of the verts of the extruded tubular section should at this point snap to the nearest point on the surface of the high-poly mesh. Enter edit mode, and temporarily enable the Retopo button.

Retopo is similar to Shrinkwrap, except that it snaps the vertices being edited to any surface that is directly "under" them, "under" meaning Z-wise as projected into the screen. This is good, as you can move verts around in the viewport and they will slide along the surface of the high-poly mesh. However, care must be taken. If you move a vert over a different part of the mesh, or a different mesh altogether, the vert will snap to that part and create protrusions. This can make using Retopo on complex meshes problematic. Retopo is not suitable for the initial Shrinkwrap stage, as it causes all selected verts to snap to the projected surface, rather than the nearest point, in effect flattening the object against the visible surface. So I only use it for tweaking and editing after a Shrinkwrap is applied. It is best to get your extruded sections scaled and fitted as closely as possible to the high-poly before applying Shrinkwrap, thus to reduce the amount of manual Retopo tweaking you must do
July 07, 2010 06:52 PM
You must log in to join the conversation.
Don't have a GameDev.net account? Sign up!
Profile
Author
Advertisement
Advertisement