Until recently, that is. I've sort of laid aside further work on the Accidental noise stuff, considering it "good enough" for my current needs, and have now turned my efforts toward polishing up a here-to-fore rough part of my skillset: 3D modeling and texturing. It's been... fun.
Modeling, texturing, and animating require a great deal of patience, I am learning. One can tweak on a model for hours, trying to achieve just the right silhouette, or fiddle with the texture for days trying to get the right color. And getting the right topology of a low-poly model for rigging, to ensure that no weird deformations occur during animation, is an exercise in sheer willpower sometimes. Overall, I have found the process enjoyable, but there are definitely timesinks. In all, my respect for the pros has greatly increased. Art is hard.
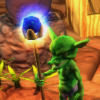
Nevertheless, I think I have made some headway. This screenshot represents my very first full character taken from high-detail sculpted mesh all the way through low-poly re-topo, skinning, texturing, and animation.

He ain't great, that's for sure. I spent some time on his head and shell, then--impatient to move on to learn the rest of the process--I roughed in his arms and legs and went to paint. I definitely wouldn't use him in any kind of real game, but I absolutely learned a lot in the making of him.
First, a bit on the workflow I've been playing with. Some time back, I discovered a neat little free tool called Sculptris. It's a digital-clay type sculpting app. While it is nowhere near as fleshed out as, say, ZBrush, it's free and fairly stable. And fun. And being poor, I can't really afford ZBrush, so Sculptris is what I have.
The neat thing about digital clay as the sheer intuitiveness of the modeling process. You can rough out a model in minutes, pulling here, pushing there, tweaking and creasing and smoothing, with no regard for the underlying mesh. Crank up the detail on the subdivision a bit for those wrinkles and creases that have to be just right, crank it back down for those large expanses of smooth surface, watch your facecount a bit, but for the most part you just sculpt. It's a highly liberating act, an act of pure creation and expression, and it's a great deal of fun.
Once the shape is sculpted in all it's detail, Sculptris will then UV map it and take you to Paint mode, where you can grab brushes and glob on color, paint with texture maps, and even add additional detail by painting bumps directly on the model. Once again, it is a highly intuitive and engaging process.
Once you have painted, you can save the color map, bump map, and a Wavefront .OBJ version of your sculpt for import in Blender.
In Blender, the grunt work begins. All those thousands (if not hundreds of thousands, or even millions) of faces contriving your lovingly detailed mesh represent a horrible, crushing load on even the most powerful of game engines, so the mesh needs to be drastically reduced in detail. It just so happens, Blender offers a number of different routes to achieve this, most of which I have spent considerable time messing with in the last couple of weeks.
The first, easiest, solution, of course, is to use a Decimate modifier on the mesh. Turn the detail way down. Works great for some things, not so great for others. While it achieves results very quickly in comparison to the other methods, it can produce sub-optimal meshes for the purposes of animation. Models meant to be rigged and animated have particular requirements imposed upon their topology. The underlying mesh must be structured such that no weird deformations or odd stretching occur when the mesh is animated. In particular, use of continuous and clean edge loops is key, but Decimate does not pay any particular heed to the preservation or creation of loops in the final mesh. But if you want quick results, or if the mesh is meant to be static, this option is fine.
The second and third options I played with actually sort of complement each other. The first is the use of the Re-topo button in edit mode of a mesh. (I still use 2.49 Blender, since 2.5 is a yucky unstable mess right now). Re-topo, when enabled, causes a vertex to "snap" to the surface of another mesh lying beneath the vertex being edited. If this surface is a copy of your high-res sculpt, then verts that you edit will slide along the surface. By starting with a simple shape and extruding bits of it across the surface, using re-topo to build a low poly mesh that fits tightly against the high-poly, you can construct your mesh with the particular constraints of animation skinning and rigging in mind.
You can also use the Shrinkwrap modifier on the low-poly mesh, specifying the high-poly sculpt as the target. This isn't quite so intuitive, since the verts aren't snapped to surface when the object is in edit mode, but it has the particular advantage of snapping all points in the mesh to the nearest point on the target surface, rather than just projecting the point into the screen along the current view until it contacts the surface. This means that, using Shrinkwrap, you can, for example, construct a simple circle mesh and extrude it in tubular sections to loosely outline an arm, and when the Shrinkwrap is applied, it snaps the vertices to the nearest locations on the arm of the high-poly mesh.
The workflow I finally settled on uses Shrinkwrap for the brunt of it. I extrude shapes to roughly enclose the mesh, apply shrinkwrap, then use the Re-topo button to slide individual verts around so that the topo lines and joints line up more fluidly with the underlying model. Takes a lot of painstaking effort, and I still need lots more practice, but the process seems to have a great deal of potential.
Once the low-poly mesh is created, I then proceed to UV mapping it. Blender takes a lot of the grunt work out of the process. I can mark a few edges that I want to be seams, then do a Smark Projections unwrap, and tweak the settings until I get a map I can live with. It's probably not optimal, but I get decent results.
Once I've mapped the low-poly and created a new texture for it, I go to Blender's Bake tab, and begin to bake my maps.
Now, I'm aware that modern engines require a lot of maps. Diffuse, specular, normal, etc... All of this can be done using Blender's baking functionality. While I don't make use of all the maps personally in my current project, they can all be done.
Baking is the process by which detail (coloring, shading, normal direction, etc....) is extracted from the high-poly mesh and written into the texture(s) to be applied to the low poly mesh. Imagine projecting the lowpoly onto the highpoly, and extracting the data back out onto the lowpoly's texture map. Bumps, intricate detail, etc... all the things we lost when we so drastically reduced the mesh detail are somewhat restored through these baked details. It is not a perfect process, but for game models, it works very well.
I currently simply do a Full Render bake, with Ambient Occlusion enabled and a particular 4-light lighting setup meant to reduce directional light artifacts. It, again, is not optimal, but I'm still learning. And since, right now, I'm not using normal mapping in-game, it's about the best I can achieve.
Rigging and animating, I have done before so I have learned little there that I didn't already know. I still need a lot of work (mostly in the patience department) to actually get "good" at it, though.
Once it's all rigged, Blender's OGRE Meshes export plugin takes care of the rest, and I can import the model in game.
I'm fairly happy with the results, considering my general lack of artistic ability.

Your thoughts on baking was good read. I've never thought about it much but I can see now how the process works.
Good job on the model too! =) congrats